


Thank you for choosing Yardian. The following simple step-by-step instructions will guide you through the easy installation of your new Yardian. You can have your Yardian up and running in just 5 simple steps. If you require more detailed instructions, please refer to the User Guide.
First, ensure that you power off the old controller. Then, take a picture of the current wiring on your old controller as a reference. Next, use the numeric stickers provided with your Yardian to label each wire. Carefully remove each wire from the old controller and disconnect it, leaving behind the confusing and frustrating settings. Now, it’s time to install your Yardian and enjoy the ease of scheduling your watering cycles.
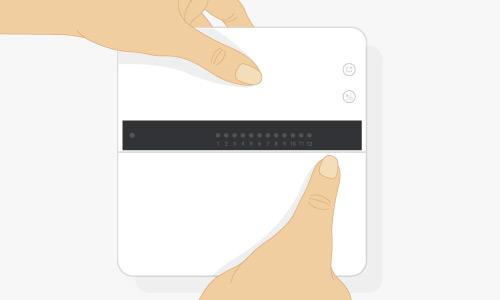
Now that you have successfully removed your old controller, let’s move on to installing the Yardian. Start by opening the top cover of the Yardian by pulling at the side as shown in the picture above. Gently mount your Yardian to the desired location and insert the valve wires into their corresponding zone terminals. Once that’s done, simply plug in your Yardian.
You can verify your installation without an Internet connection or a cellphone. Use the control buttons on the Yardian Pro to initiate a zone scan, which will assess the connection and status of your sprinkler valves. Additionally, you can start specific zones with specified durations directly on the device.
After installing your Yardian, let’s proceed with setting up the Yardian app on your mobile device. First, download the ‘Yardian’ app from the App Store or Google Play. Once downloaded, open the app and follow the instructions to create an account. After creating your account, sign in to the app.
After signing in to the Yardian app, click on Add Home button and give your home a name. Then, click on the gear icon in the middle to specify your location and select the corresponding weather station. You can either locate your home on the map or enter the latitude and longitude manually.
Users in the U.S. can further specify their city and the water provider for that city. This allows Yardian to assist in checking the current water restriction rules in your area.
After setting up the Home, click on the Please add a new device button and enter the 8-digit YID (Yardian ID) found on the product label of your Yardian controller. This will complete the pairing process.
Now, let’s proceed with the most important part that will make your Yardian smarter than your old controller: getting your Yardian online. You can achieve this through either a direct Ethernet connection, which is a unique feature of the Yardian Pro, or Wi-Fi onboarding by following the steps below.
First, ensure that your mobile device is in close proximity to the Yardian and connected to a 2.4GHz Wi-Fi network. Next, check if the Yardian LED light is alternately blinking green and blue. If it is not, press and hold the Wi-Fi reset button for more than 5 seconds, and then release it once you see the alternate green and blue light.
For iOS users, it is necessary to use the Apple Home App to complete Wi-Fi onboarding.
For Android users, please follow the steps below:
Now it’s time to explore the Yardian in detail. You can refer to our comprehensive User Guide, or continue using the Yardian App for further guidance.
| Cookie | Duration | Description |
|---|---|---|
| cookielawinfo-checkbox-analytics | 11 months | This cookie is set by GDPR Cookie Consent plugin. The cookie is used to store the user consent for the cookies in the category "Analytics". |
| cookielawinfo-checkbox-functional | 11 months | The cookie is set by GDPR cookie consent to record the user consent for the cookies in the category "Functional". |
| cookielawinfo-checkbox-necessary | 11 months | This cookie is set by GDPR Cookie Consent plugin. The cookies is used to store the user consent for the cookies in the category "Necessary". |
| cookielawinfo-checkbox-others | 11 months | This cookie is set by GDPR Cookie Consent plugin. The cookie is used to store the user consent for the cookies in the category "Other. |
| cookielawinfo-checkbox-performance | 11 months | This cookie is set by GDPR Cookie Consent plugin. The cookie is used to store the user consent for the cookies in the category "Performance". |
| viewed_cookie_policy | 11 months | The cookie is set by the GDPR Cookie Consent plugin and is used to store whether or not user has consented to the use of cookies. It does not store any personal data. |